This was a project done last year and I thought I had made a post about it, but looks like I did not.
After several small span Catalan roofs we decided to roof this
room using our new skills. This method is referred to by many names:
Catalan, timbrel, cohesive tile. I will use Catalan.
(Note the modern scaffolding!)
First we built end walls to draw the catenary shape templates, run strings to control the shape, and "glue" the tiles.
I bought handmade floor tiles for the first course for aesthetic
reasons.
Butter two sides of a tile with gypsum plaster.
Tap into place and hold 1-10 seconds.
And then move on to the next one. It is a bit tricky as the first
one has to be "set" so better to build in two places or use gypsum that
is almost set.
A video is found
here
Building on each side .
Conduit pipe for ceiling light.
From above 3/4 done with first course of tiles. Sometimes extra gypsum plaster applied to help hold until an arch is completed. gypsum gives no strength to the vault, it is just to hold until an arch is finished.
About to close the first layer. We were excited about how good it looks.
After finishing the first course. We had disagreement on whether to do the other 2 laminate layers as we went along or finish one course at a time.
It did bring and issue .
Before I talk about the hole. This shows the 2nd and third courses with different bonds, first at 45* then at right angle to original bond. After 24 hours you can stand on the 3 layers. Mortar is cement - lime - sand 1-1-6.
Mason Dickson preferred to finish first course then sit on the end wall and lay 50cm of other courses, next day sit on the first 50 cm and lay another 50cm. Worked okay until someone put something heavy on current days work and it collapsed!
As it dried out efflorescence occurred on the beautiful tiles but i figured it would dry and fall off like our bricks. It is a year and still ugly like this. I just tried washing it off and that looks like it will work.
we filled in level and then put heavy plastic and then 5cm concrete sloped into a drain pipe.
On a small Catalan vault we roofed with tiles to see how well that would waterproof the roof.


 I just had a Renaissance moment, a real eureka moment.
 So here it is
 I mean look how steep that is!
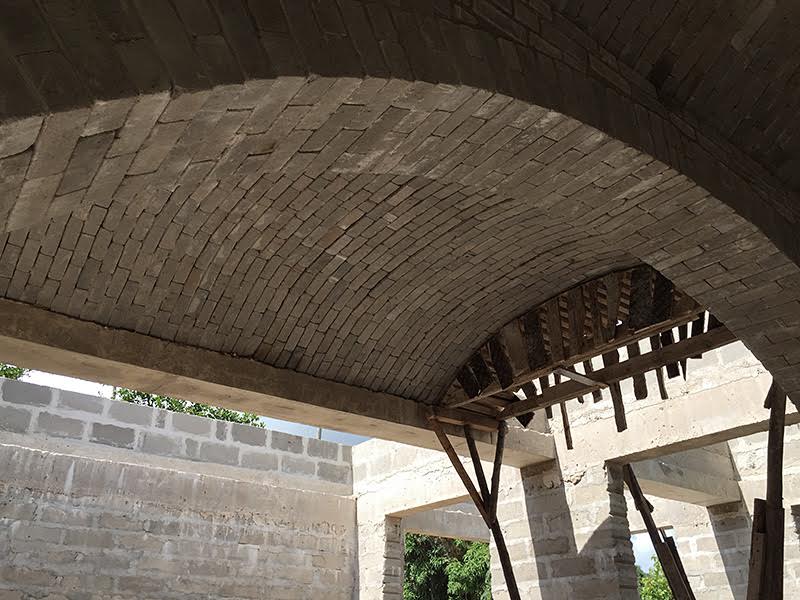
 Our crew went a month ago to Langarini SE of Arusha to put up some brick vaults. Above are the vaults outside the walls. Since they will be loaded they are segments of circles.
 And the vault finished inside one room. span is 3.5 meters. We didn't do the walls or the columns and beams. This is to be the office and retail store for Infinity Winery owned by Erik Zweig.
 Back of the building.
 The corners will be corbelled off both sides.
 Our man Dixion finishing one end.
 Another room
 Looks good after pointing.
 On top. the space between will be filled with lava gravel and then a slab.
 Festo pointing
 the 'eaves" from the top
 Me admiring the building. Dixon uses level on top to keep the courses true to shape.


