Wednesday, December 4, 2013

Second try at dry stack retaining wall

Sean and Matt hope you will comment.

Dig some stones out of a hole. This hole will be used to make an underground dome water tank. Some parts of my land has this rock a meter down.

Then you get a pile of rock. These are not the greatest, too roundish, but what i have. Costs me about $6 per m2

Elia is a mason we brought in to speed things up. He did this wall. he gets better as we go left.

As requested some side shots.


For the cap I expect some dirt and grass will hold the back few pieces in place.  Along the edge are big flat pieces.


From the other end of the wall where it is shorter.
And the last part being built,  the stones left are smaller.  Lots of ruble put behind.
A
 Some detail of the top pieces.

How I make the wood floor

Cut a tree down, preferably a sustainable harvest.

 I had some grevilia robusta trees, a semi hardwood about 40 years old.  I took a few out.

 Hire someone to cut the logs into lumber. Next time I will use the guys who do it by manual 2 meter saw. This time it was chain saw. too much loss, too uneven
Movie cutting logs by pit method. Very cool
run the boards throw a shaper to plane to uniform thickness
then they look something like this
Then rip with this table saw


Then I cut the strips into 50cm lengths

Sunday, December 1, 2013

Floor almost there

First mistake was cutting the trees into planks with chain saw. I thought it was pretty even but now realize they are not very uniform and I lost too much in the cut. I thought I would get 50m2 of 2cm thick flooring. I got about 31m2. Some the wood was not mature and there is alot of waste and maybe i calculated wrong, or some dissappeared. I have 3m2 left after i glue the last pieces. I have some odd pieces to match up. After cutting i have 50cm strips 2cm thick 4-4.5 wide

Dry stack retaining wall

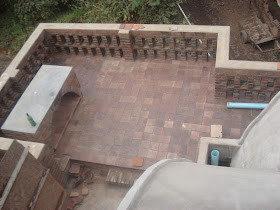
Retaining wall for new driveway. First major drystack attempt. Stones came from hole 30 meters away. Hole is for water tank.


Back filling on the road. Needs to come up another meter.

Saturday, September 28, 2013

"The architect of the future will construct by imitating nature, because it is the most rationale, durable, and economic method."    D. Juan Torres ~1870

Rafael Guastavino was his student. 


Tuesday, September 17, 2013

Nashesha helping to tie the rebar for beams.  This is for a church in northern Tanzania.  She tagged along with a church group from USA volunteering.

Tuesday, August 20, 2013

Should i keep this mason?


Keyhole gardens is a popular gardening method recently.  Nashesha, our 14 year old daughter,  did some research and did this today.  She is half through filing with compost, soil, waste, etc.

Should I pay her?

Wednesday, August 14, 2013

Recycled wood , Stan's packing crate

Stan Benson is a significant part of my life.  He found me a couple of jobs in Tanzania and encouraged me in what I was doing.  He retired to the USA maybe 20 years ago after spending about 40 years in Tanzania as a missionary.

He was a missionary first in Borneo before coming to Tanzania.  In about 1950 he left Borneo with this crate in the picture below, maybe a year later he came to Tanzania and stayed about 40 years.  (This is my beautiful wife Bernice).


When Stan left for retirement he cleared out all his junk and brought a pickup load to me.  There were many treasures in there, like a box of odd bolts and nuts, hinges, morticed wood boxes that hoes came in,  etc, and this crate.  It weighs allot.  It is the heaviest wood I have touched, including our own loliondo wood.

While farming it  became the chemical cabinet, then it was a box to store scrap metal.  In Dec 2009 I took it apart and tried to remove all the nails.  It was too heavy to move around.  Even the nails were interesting.  Then I planned one board and realized it was beautiful wood.  I looked at it in a different light.

It was on my list to make into furniture, and when daughter Nashesha came back from grade 9 as exchange student she needed another clothes cabinet.  So this was made.  I can barely lift it up.  Planning the wood on the shaper took 4 times as long as African teak.  It has some imperfections but it will last forever and I will think of Stan Benson when I see it.

Thank you Stan for the memories.


Wednesday, August 7, 2013

I just met a vault star

I just met a rock vault star.

I was minding my own business, and was transitioning from contractor to managing director and was about to leave for my office job.

Fred Nnko, a builder, calls after many months and says there is an architecht from South Africa and he would like to show him some of my vaults.  He suggests Kisongo but I say come to the brick factory.

I envision the architect being ho hum about vaults like engineers. 


So I meet Peter Rich pictured above and realize right away he knows all about vaults.    Then he mentions he was the architect on the Mapungubwe Interpretation Center In South Africa! 

"Sorry what is your name again"
"Peter Rich"

  This Center won a world architectural award in 2009 and I have spent hours looking at pictures of it.  I mean this guy has taken timbrel vaulting to extreme levels, and the architect is standing there in my house talking shop!


One article about this is here .

He knows and works with people I read about such as John Ochsendorf.  After some years maybe now I have someone to discuss things with.  Like right away he said what i want is quick setting gypsum.  We talked about water proofing.  We talked about materials.

I felt like I had met a star.

Monday, August 5, 2013

Groined vault house update

Some months ago we started again on the finishing work.  I have posted about the catalan vaulted stairs and ceiling in bath, but here are some more.


Tuesday, July 30, 2013

First Timbrel/catalan Vaulted ceiling / roof.


After the success with Timbrel vaulted stairs I was itching for a roof.  We added a bath on the terrace and so roofed with .....
timbrel or cohesive tile, or catalan vaulted roof.

This is the bath on the terrace.

 We used hand made floor tiles for the first layer.  they are not so square and it would be better if they were longer than wide but they look great.


 Then another two layers of our rough "tiles" in cement.

amazing how much stronger it feels.


some pic showing top of first layer and beginning second layer